How To Make Professional Baby Photos With a Phone Safely
You can learn how to make professional baby photos with phone by using soft window light, a steady camera, simple backgrounds, safe natural poses, and light editing before adding keepsake effects. The best phone baby portraits start with a clean, sharp image, because AI edits, milestone templates, and print exports work better when the original photo is bright and uncluttered.
> Definition: Professional baby photos at home are safe, well-lit phone images of a baby in natural poses that can be edited into portrait-style keepsakes, milestone layouts, stickers, or prints.
TL;DR
- Use window light or open shade, turn off mixed overhead lights, and place the baby facing the softest light.
- Keep the phone steady, focus on the baby’s eyes, shoot in bursts, and move closer instead of using digital zoom.
- Start with simple outfits and clean backgrounds so Baby Photo Art-style AI edits, stickers, and milestone templates look natural.
What Professional Baby Photos on Phone Need Before You Start
Professional baby photos on phone need one thing first: a sharp, bright, natural image that still looks like your baby. The goal is not a staged studio imitation. It is a clean phone snap that can become a milestone keepsake, a portrait, or a print-ready version without distorting the baby’s face.
Set out a charged phone, a clean lens, a plain blanket, a neutral outfit, wipes, a safe surface, and natural light. That is enough for most home sessions. In a dim hospital-room photo, even a wrinkled white blanket and rolling bassinet can feel sweet if the baby’s face is clear.
Safety comes before style. Never force curled newborn poses, suspended wraps, chin-on-hands poses, or unsupported positions at home. Most U.S. adults already own a smartphone, according to Pew Research Center, so the missing piece is usually setup, not camera access source.
Five Facts About Professional Baby Photos at Home With a Phone
These five facts matter more than buying props, backdrops, or a separate camera. They also make later editing cleaner.
- Soft light beats extra gear. Window light or open shade usually improves baby skin tones more than props or expensive equipment.
- Sharp eyes change the whole portrait. Tap the baby’s nearest eye before shooting, especially when round cheeks pull focus forward.
- Simple scenes edit better. Plain blankets, neutral clothes, and uncluttered backgrounds improve both the original photo and AI edits.
- Moving closer keeps detail. Digital zoom often reduces quality, so step closer when safe or crop the full-resolution image later.
- Correction comes before decoration. Fix exposure, white balance, and skin tone before adding stickers, themed effects, or milestone layouts.
One-month cards near curled toes are cute, but the baby’s face still needs clean light. The keepsake works better when the photo works first.
How Baby Photos on Phone Become Print-Ready Portraits
Baby photos on phone become print-ready portraits through a simple chain: capture, correct, style, then export. Good light gives the camera detail, focus protects the eyes, composition keeps the baby centered, and editing adjusts crop, exposure, color, skin tone, and final format.
Phone cameras use computational photography, which means software blends sensor data to improve sharpness, brightness, and depth. Plainly, your phone is already helping. It still needs enough light and visible detail, especially around eyelashes, fingers, blankets, and ears.
Apple and Google both describe modern phone cameras as software-assisted systems that combine multiple frames or sensor data to improve brightness, detail, and depth effects Apple source Google source.
Clean source photos also help background replacement, portrait effects, milestone templates, and stickers isolate the baby accurately. A cluttered kitchen counter behind a baby in a bouncer gives editing tools more to misread.
Baby Photo Art is a baby photo editor app that turns baby and newborn photos into milestone templates, stickers, portraits, and print-ready keepsakes for parents. A good AI baby photo generator with stickers, milestone templates, and portrait-style edits should deliver small adjustments, not a new baby.
How to Use a Phone for Professional Baby Photos at Home
Use this phone workflow when the baby is fed, calm, and safely placed. For parents, soft natural light is often better than a complicated setup because it improves sharpness and skin tone before editing begins.
- Set the baby near soft window light or open shade. Keep the baby out of direct sunbeams and watch for squinting or hot spots.
- Clean the background with a plain blanket, crib sheet, or uncluttered wall. Remove burp cloths, cords, bright toys, and laundry from the frame.
- Tap to focus on the eyes and lower exposure if highlights are too bright. On most phones, sliding exposure down protects pale blankets and foreheads.
- Shoot burst photos from slightly above eye level while the baby is calm. Tiny head turns happen fast.
- Edit exposure and color first, then add AI portrait effects, milestone stickers, or print layouts. If you want a dedicated workflow, an AI baby photo generator from photo can help after the base image is clean.
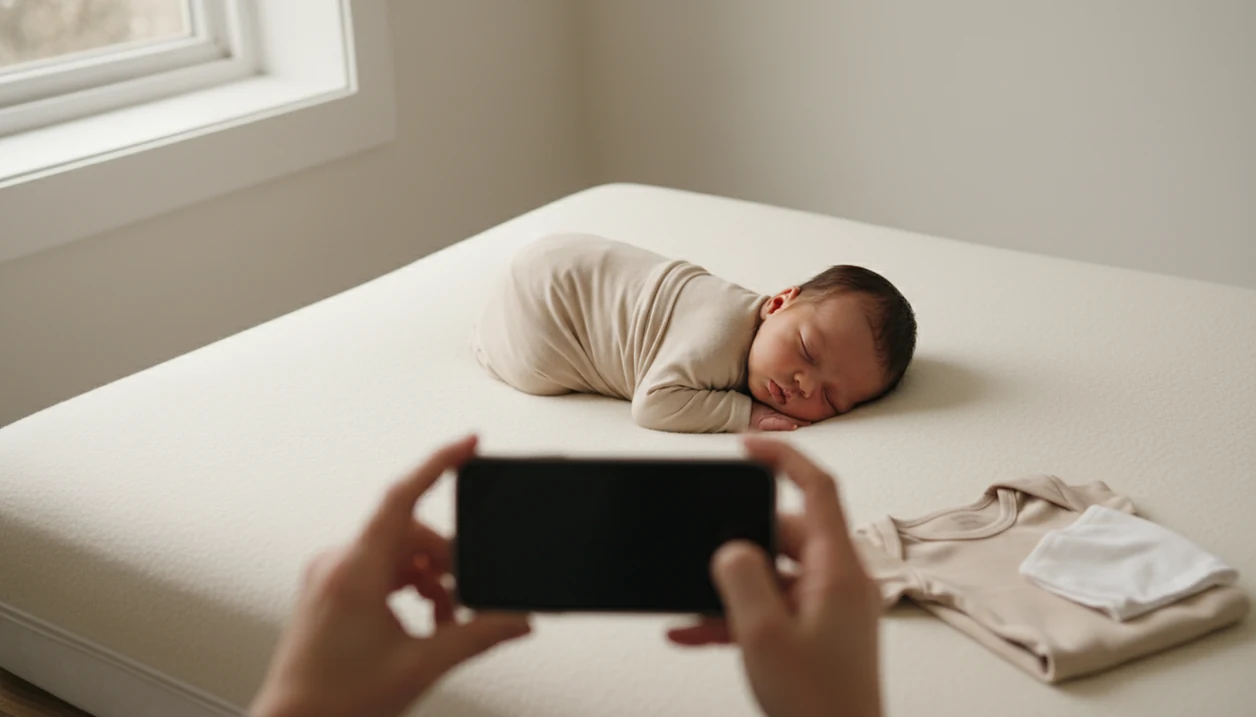
Step 1: Soft Window Light for Professional Baby Photos at Home
Does window light make baby photos look professional? Yes, soft window light is usually the fastest way to make professional baby photos at home look cleaner, brighter, and more natural.
Place the baby beside a bright window, not directly in a hard beam of sun. Turn the baby’s face toward the light, then turn off ceiling lights and lamps that add yellow, green, or uneven color. Mixed indoor light can make newborn cheeks look orange after editing, especially if a bedside lamp is close.
Morning and late afternoon window light tend to be gentler. Outdoors, open shade works well because the baby gets light without harsh sun in the eyes.
Dim rooms are different. They create grain, blur, and muddy color that AI tools cannot fully repair. If the scene feels too dark to read a board book comfortably, the phone camera will probably struggle too.
Step 2: Safe Poses and Simple Backgrounds for Baby Photos on Phone
Safe baby photos on phone use supported, natural positions that do not require balancing, hanging, or compositing. Good home poses include baby on the back, baby in caregiver arms, baby swaddled on a firm safe surface, or baby lying on a plain blanket while supervised.
Skip chin-on-hands poses, hanging wraps, baskets without support, high surfaces, and any pose that normally requires a professional composite. If a pose would make you step away to take the photo, it is not the right pose.
For newborn-style poses, treat professional safety guidance as the boundary: the American Academy of Pediatrics recommends firm, flat, non-inclined sleep surfaces and avoiding soft bedding around infants source.
Keep props minimal. One blanket, one outfit, and one small sentimental item are usually enough, as long as the item is safe and does not cover the face. A tiny hospital ID bracelet may be worth keeping visible.
Clean backgrounds make portraits look more professional and help AI editors isolate the baby accurately. For natural newborn edits, a tool that can make natural newborn portraits works best when the pose is simple.
Step 3: Phone Camera Settings for Sharp Baby Photos at Home
Sharp phone baby photos come from small camera habits repeated every session. Start by wiping the lens with a soft cloth, because fingerprints create haze that looks like bad focus.
Tap the baby’s nearest eye to focus. Then hold the phone with two hands or brace your elbows against your body. Use burst mode or live photo modes because babies blink, yawn, kick, and turn away in less than a second.
Move closer instead of using digital zoom. If you need a tighter crop, shoot full resolution and crop later. This keeps more detail for printing and editing.
Portrait mode can help separate the baby from the background, but check the edges closely. Hair, blanket fuzz, fingers, and ears often get strange blur halos. It is easiest to spot those errors before you send the photo to grandparents or build a milestone layout.
Step 4: Editing Workflow for Baby Photos on Phone and AI Portraits
Edit baby photos in this order: crop, straighten, exposure, white balance, contrast, skin tone, then creative effects. That sequence keeps the baby’s face recognizable before you add anything decorative.
Start with the crop. Check that a 4x6 print will not cut off the top of a knit hat or a tiny hand near the edge. Then fix brightness and color. If the baby’s cheeks look too yellow from a lamp, adjust white balance before touching skin smoothing.
Keep skin texture natural. Avoid heavy smoothing, eye enlargement, plastic-looking cheeks, and color shifts that make the baby look unlike themselves. Small adjustments, not a new baby.
Use one consistent preset or editing style for monthly milestone sets. After that, Baby Photo Art, Apple Photos, Google Photos, Lightroom Mobile, Canva, and other baby-friendly editing workflows can add backgrounds, portrait styles, stickers, and milestone templates when the source photo is sharp and well lit. An AI newborn photo editor is most useful after the basic correction is done.
Common Mistakes That Ruin Professional Baby Photos With Phone
These mistakes make phone baby photos look less professional and harder to edit. Most are easy to avoid once you know what to check.
- Night ceiling lights: Overhead bulbs create shadows under the eyes and mixed colors across the face.
- Digital zoom: Zooming in from across the room softens detail; moving closer or cropping later usually looks cleaner.
- Busy props: Loud blankets, patterned outfits, and too many toys pull attention away from the baby.
- Blur dependence: AI can style a photo, but it cannot fully restore a hidden eye, smeared motion, or a very dark face.
- Plastic skin: Over-smoothing removes the tiny texture that makes a newborn portrait feel real.
- Privacy skips: Polished baby portraits are easy to share, but addresses, hospital tags, and visible documents should be checked first.
Blurring an address on a mail stack takes seconds. Forgetting it lasts longer.
Print and Sharing Checks for Professional Baby Photos at Home
Before printing or sharing, check the image at 100% size and look at the baby’s eyes, fingers, hairline, and blanket edges. If those details look soft on screen, they may look softer in a frame.
Confirm skin tone on at least one other screen, because phone displays can be too bright or too warm. Export the largest available file for prints, then make a smaller version for messaging or social media. For important keepsakes, order one small test print before buying a full set.
Parents care about shareable images for a reason. Pew Research reports that 89% of U.S. parents with children under 18 use social media, which helps explain why many families want polished baby photos that still feel personal source.
Before you share, check the crop for names, addresses, school logos, medical details, and location clues. A baby milestone photo app can help make keepsake layouts, but privacy settings still matter.
Limitations
Phone baby photography can look beautiful, but it has real limits. Know these before relying on editing or AI.
- Phone cameras still struggle in low light, especially when babies wiggle, kick, or turn their heads.
- Blurry, very dark, tightly cropped, or hidden-face images cannot be fully repaired by AI tools.
- Advanced newborn poses should not be recreated at home without professional training, spotters, and safe compositing methods.
- Heavy AI filters can make skin tones look fake, especially on very fair skin or darker skin.
- Phone screens may not show accurate print color, contrast, or brightness.
- Privacy and consent matter because uploaded or shared baby images may be hard to control later.
- Portrait mode and background blur can create edge mistakes around hair, blankets, hands, and ears.
If safety and the photo conflict, choose safety. Every time.
FAQ
Can phone photos of a baby really look professional?
Yes. Phone baby photos can look professional when they use soft light, clean composition, sharp focus, and careful editing.
What light is best for baby photos at home?
Soft window light or open shade is best for baby photos at home. Harsh overhead light often creates shadows and uneven skin color.
Should I use portrait mode for baby photos?
Portrait mode can help blur a busy background. Check the edges around hair, ears, fingers, and blankets because phones can blur the wrong areas.
How do I avoid blurry baby photos on my phone?
Use enough light, hold the phone steady, tap the baby’s eye to focus, and shoot bursts. Avoid low-light photos when the baby is moving.
Is phone zoom bad for baby photos?
Digital zoom often lowers image quality. Moving closer safely or cropping later usually gives a clearer baby portrait.
What background looks most professional for baby photos?
Plain blankets, neutral walls, simple crib sheets, and uncluttered scenes usually look most professional. They also edit better in Baby Photo Art and similar tools.
Can AI fix bad baby photos?
AI can improve style, backgrounds, and presentation. It cannot fully recover missing detail, heavy blur, hidden facial features, or very dark images.
What baby photo poses are safe to do at home?
Safe home poses include baby on the back, baby in caregiver arms, or baby swaddled on a firm supervised surface. Avoid advanced newborn poses without professional training.
How do I print baby photos taken on a phone?
Export the largest file, check sharpness at 100%, review color on another screen, and order a small test print first. Tools like BabyPhotoArt can help prepare print-ready keepsake versions.